|
This project is a great addition to your Space Travel unit. Geometric shapes
lesson includes; cylinder, cone, square, circle, rectangle.
(Step-by-step
diagrams on next page).
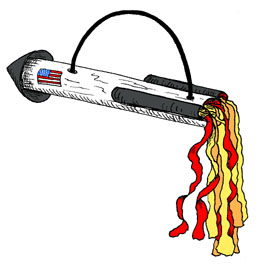
Materials Each student will need:
- Paper, 12" square (file-folder weight)
- Aluminum foil, enough to cover the 12" cylinder
- Black yarn, 24" long
- Two pieces of black construction paper, 5" x 3"
- One 4" circle of black construction paper
- Tissue paper; red, yellow, orange
- Three 1" squares of construction paper, different colors
- A school photo of student (the pilot)
- Small American flag stickers
- stapler and glue
Directions
- Roll the 12" square into a cylinder, aproximately 3" in diameter and glue
or staple in place.
- Cover the cylinder with aluminum foil. Tuck the foil into the ends of the
cylinder.
- Using a pencil, poke two holes into the cylinder along the same line; 1"
from (what will
be) the back and 3" from the front. (see diagram)
- Tie a knot in one end of the black yarn and thread, from the inside,
through one hole.
Thread the yarn through the second hole, pull out the end, tie a knot
then pull to lock into
place. This is your hanger.
- 5-A, 5-B, 5-C. Roll the 5" x 3" black construction paper into two 5" long tubes. Train
the paper by
rolling tightly over a pencil. Glue along the 5" seam; count to 100.
These are your rocket
"boosters." Glue your boosters onto the back of your rocket, one on each
side.
- 6-A, 6-B, 6-C, 6-D, 6-E, 6-F. Fold the 4" circle of black construction paper in half then in half again
to find the center.
Unfold and cut along one crease to the center. Overlap the edges to form
a cone. Staple.
Glue to the front of your rocket.
- 7-A. Tear the tissue paper into 1" strips. Divide into three sets. Twist the
ends of each set
together. Glue your "flame" into the two "boosters" and the end of the
rocket.
- Glue the three 1" squares to the top. These are your computer modules.
Add the American flag sticker. Glue the photo of the student pilot to
the bottom of the
rocket so it can be seen by all the earthlings below. Now BLAST OFF!
Step-by-step
diagrams on next page.
|